
*Or any other thing that involves post it notes and hand waving
Note: this is features heavy use of the online whiteboard tool Miro. I’m not affiliated with them in anyway nor are they being endorsed by me. Use whatever you like/whatever is not blocked by your organisation’s firewall. Other suggestions have included Google’s Jamboard? Murally? Just use whatever is comfortable for you/you can explain to someone else – the same principles apply.
Global Pandemic or not, remote workshops are tricky and here’s the three scenarios I have done them in. However, ther are always other perfectly good reasons to have a remote workshop.
Very good reasons to have a remote workshop
- Travel can take a long time from different regions of (particularly) Australia and the stress increases the more timezones you cross. I imagine this is similar across many regions of the world!
- COVID is going to be around for awhile, not everyone is going to be comfortable with either coming to the office or travelling. In my opinion, this is a very very OK thing to feel and we should support it where possible.
- Participants may not want to travel just for a day often have very valid reasons for not doing so (e.g. caregiving responsibilities, mental health issues, whatever it is leave it alone)
- Participants may have a disability or mobility impairment that means they would prefer to work from home.
- Travelling from multiple locations for a short time period is probably not the best for the environment.
Recipe 1: You’re remote, your clients are all together in another location. <10 people. (preferred)
What you will need:
- A remote white board, I use Miro
- A Video Conferencing system that isn’t blocked by your client. I have previously used CISCO Webex which enables screen share, phone dialling in (in case it all drops out) and video which is critical.
- One person on the other side scribing for you. Make them your best friend.
- For yourself: two desktop screens. One for the whiteboard, one for whatever else you need to do at the same time – chatting to your scribe via Slack? Figure that out ahead of time.
- A quiet room for yourself where you won’t be interrupted.
- A conference room for them with adequate desks and chairs to see the projected Miro board
Before you try this
- Skip buying the post it notes, Miro has them on the system.
- Get comfy, this could be a long time. I have done this one sitting at my desk with two sprained ankles propped up on a fitball (which works great if you’re like me and have bad knees too).
- Stick to one scribe, if possible, from the client’s group. The rationale behind this is that if you have one person being the scribe (the only other addition being possibly another UX person from your team remote with you) is that you avoid having to teach everyone the system. Design is a bit of a benevolent autocracy and losing control of the workshop is particularly tricky when everyone is remote and empathy breaks down for reasons I’m yet to understand.
- Don’t ask for volunteers to be the scribe, just ask whoever is the most knowledgable in the room to do it and if they’re happy to type. If they say no, ask them to recommend someone else in the meeting. I’ve never tried it but I’m very sure people are happy to take turns being the scribe and having a small break.
- Note: Some people enjoy being the scribe! If you’re anything like me you just enjoy having something to do whilst others are talking.
- Test that system in the allocated room before the workshop.
The recipe
- Welcome everyone to the workshop and briefly explain what the group is going to be accomplishing. Draw attention to the online whiteboard tool and point clearly to the person in their room that’ll have the power of being a scribe.
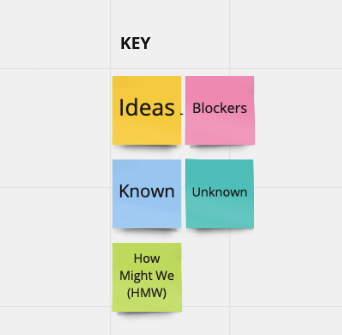
- Start with a key, this will make it easier on the scribe and the people staring at the screen to decipher what all the post it notes mean at a glance. Introduce the Key at the beginning to all participants and the Scribe. I don’t have a work around for colour blindness so just be gentle if someone needs something clarified.
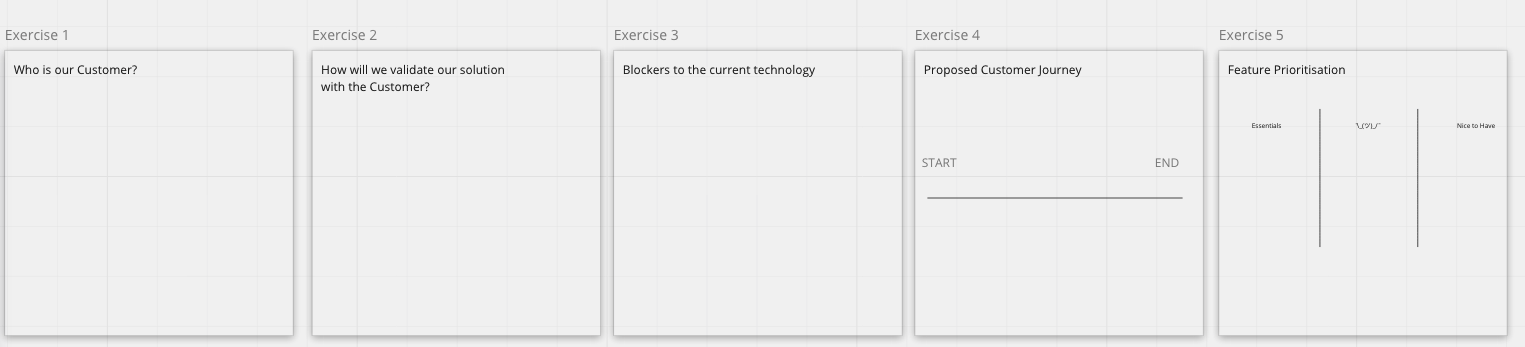
- Show the overview of what you’re doing. I like to think of it as a worksheet from primary school. Everyone knows what is going to happen. I prefer these to art boards – and generally you can add those later. I have changed my methodology on this because I have found people (probably in the western world at least) respond better to board that sequentially lead from left to right.
- Set some ground rules for how interaction is going to happen. Are you and the scribe going to be writing as people are talking? Can they see that on a projector screen in real time or are they going to be viewing it (with a view only invitation) on their personal laptops (plan for both, HDR adaptors die/dongles are forgotten, screens fail).
- LOCK DOWN ALL THAT CANNOT MOVE. Anything you don’t want edited by accident, lock it.
- Start Workshopping, outline the tasks that you’re doing and start noting down with the scribe what people say. Miro has a bulk add post it mode that’s handy.
- You can print off a PDF of the workshop if you have a pro account for the clients later, but make sure you duplicate your board after your workshop. Participants get excited about workshops and may go to show their colleagues later and accidentally delete or move something.
Things that require workarounds
Synthesis on the fly is going to be a bit harder as any silence in the call will feel like a long time as you organise ideas. You’re going to have to build in breaks that require participants get up and have a drink of water whilst you group everything together and maybe draw a view arrows just because the cumbersome nature of Graphic User Interfaces.
Also VOTING! This is a bit trickier in the Miro style interfaces, the best I have found is to draw circles yourself and allow participants to drag it onto the post its. Just make sure you synthesised and tidy up first so participants know what they’re doing. (Note: this is a technique I stole from Viveka Weiley)

Recipe 2: You’re onsite, some of your clients are onsite, but others are in another location. <10 people. (preferred)
Here it gets a little tricky. Ultimately if the bulk of people are in person, it’s better to have them use physical post it notes. It’s quicker, easier, and generally gets people doing more. However, sometimes VC equipment doesn’t show a particular wall of a room – or the camera cannot focus. In this case…
You will need
- An assistant, probably 2, on site with you. A scribe to write up physical post it notes and probably another to answer questions in slack from remote participants and clarify what is going on if the connection drops out.
- A decent phone camera WITH internet connection
- Try to get a decent internet connection, but if it’s overloaded with VC, this sometimes cannot be helped in a location that’s just too dense or maybe just too far out of phone signal
- Patience. What can go wrong will go wrong and people probably will get annoyed but remember they’re frustrated with the technology, not you.
The recipe
- Get a laptop trained on the wall that has your post it notes, spend some time getting it in focus as much as possible.
- Create a miro board of post its that those who are remote wish to put on the board, get your scribe to make them physical notes on the real board in the room with the rest of the participants.
- Follow the directions of Recipe 1: create sequential boards with clear activities and move on so that they can be documented and uploaded to Slack/Teams/etc in the breaks.
- Synthesis and describe what you’re doing as much as possible so the people on the call know as much as possible about what’s going on. It may seem strange at first but the flow will happen and it may reinforce what you’re trying to do.
- Upload as many pictures of the physical board in breaks so that those who are remote have a better idea of what’s occurring.
- Continue to use sequential boards and create a record of activities so that people who are remote have a record to go back to.

Recipe 3: Everyone is remote
Many people have requested that if there are some people remote then everyone should be remote as a means of equality of experience. I would counter and say that having everyone on the same foot in a workshop is a bit of pipe dream – there’s always going to be issues with lag or telecommunications systems that are going to benefit people with faster modem speeds or maybe not sharing a network with someone who has had enough of paying for geo-blocked streaming services and has decided pirating Netflix’s entire back catalog is worth a shot during work hours (1000% hypothetical). There’s been multiple times of remote meetings where we have waited maybe 15 minutes or so for multiple people to get back online if there’s a drop out. This is all completely normal for it to fall apart at some point, or for the really key person to just not be there at an opportune moment because of life and Murphy’s law. I have been trying this for about 18 months and these are my learnings:
The recipe
- Follow the principles of Recipe 1 – set clear expectations of who is a scribe (one per location seems to work OK) and who is not, and set a “worksheet” of activities to confine everyone to stay on topic and use the right colour post it notes.
- Make sure everyone can use the software. Set up a “guestbook” practice board and you can use my video below to explain to your group how to use the software or alternatively make your own.
- Break people up into groups if you have more than 10. I wouldn’t recommend doing this with a large amount of people as generally participants will make a mess of your Miro board. Run multiple sessions and synthesis the learnings later and present them back. You will get more out of it this way.
- BE REALLY, REALLY clear of what you want to achieve in 1 hour maximum.. Generally, no one wants to be in a video conference more than an hour. If your workshop is more than an hour, you’ll have to break it up and do it over multiple days or with at least 1.5 hours of break in between. It may sound excessive but you don’t want a long workshop
- Who chairs the meeting and is therefore in charge needs to be sacrosanct. Remote meetings can turn into a horrible combination of a comedy panel show level of anarchy when there isn’t a clear structure. A chair’s job is to guide the conversation and make sure everyone is given a turn to speak or has had their contributions noted down. Everyone wants a bit of structure to tell them what to do because online workshops generally are a bit weird as they don’t have the hierarchy of someone standing at the front of a room. Find a balance that isn’t too controlling otherwise people won’t be creative either and you need that level of safety too.
- Make a plan if there’s a drop out – can the conversation continue, or can people take a tea break if it’s more than 5 minutes of trying to get them back? Can you conceivably catch up everyone if there are multiple drop outs? Can we reconvene the next day? Schedule a followup for an hour a day later to be a casual conversation or finish up the workshop. Participants often do better with a break to marinate in their thoughts.
- Can we record the meeting and are people comfortable with that? Recording conversation consent laws vary from state to state, but generally permission from everyone is required and make sure these are stored securely. Webex has an inbuilt tool for recording but I imagine Quicktime could do the trick.
Good luck and I’m sure you’ll do well in any (or all!) of these formats!
With thanks to Viveka Weiley and TFOM